All About Angel Wing Begonia Miss Mummy

Angel Wing Begonia
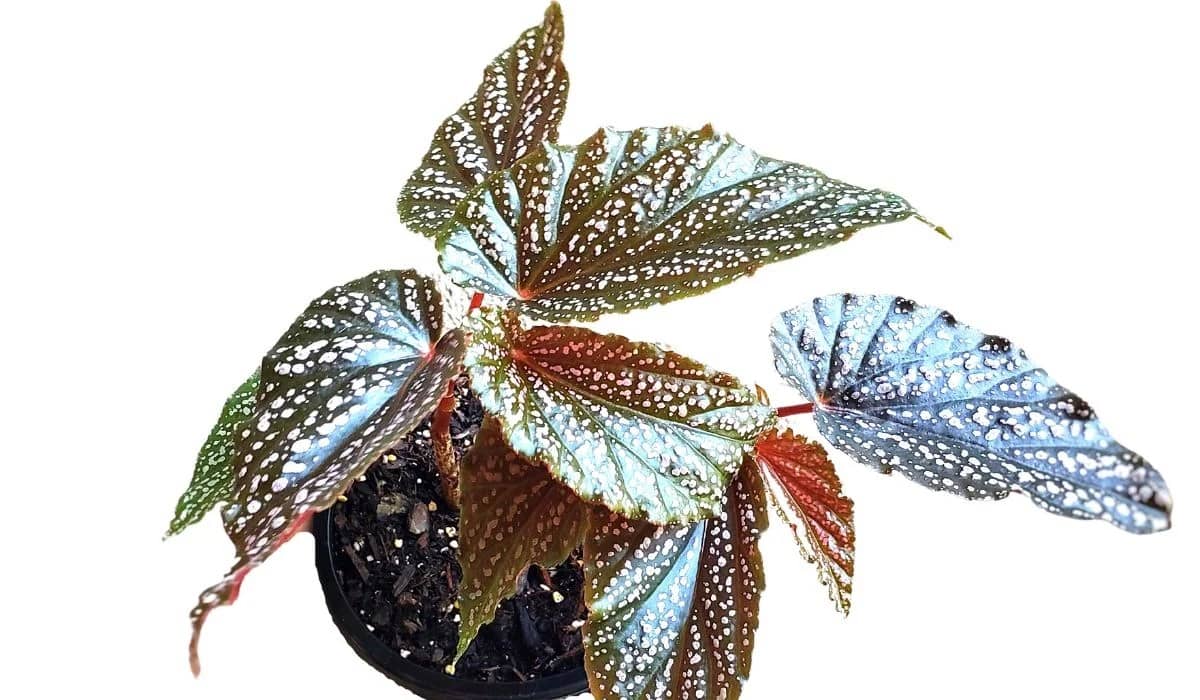
Begonia Miss Mummy is an Angel Wing Begonia cultivator with white to light pink polka dots on the leaves. Miss Mummy’s leaves change from green to bronze to pink depending on the light it receives. The color of the polka dots will also change with the overall leaf color. All Angel Wing plants get their name from the angel wing shape of the leaves.
They have small, bright pink flowers that can bloom almost any time of year. The flowers aren’t particularly showy but add a nice contrast to the glossy leaves. With enough light and proper care, they can hold blooms for months at a time.
Angel Wings are hybrid cane begonia created by Eva Kenworthy Gray in 1926. The entire line of Angel Wing cultivators comes from her original cross! Thanks to Eva and her fascination with begonias, we now have countless colors and varieties of these beautiful plants. And I thought I had a green thumb lol.
Interestingly the flowers of Angel Wing Begonias are non-toxic and Pet Safe but ONLY the flowers. The rest of the plant is toxic and should not be ingested.


How To Care for Begonia Miss Mummy
Begonia Miss Mummy tends to have slightly bushy, slower growth than some of its taller siblings. Pruning every few years will help maintain shape and keep the plant from getting unruly.
The roots are thin but will quickly take over a pot. Angel Wing Begonias develop dense root systems that need to be divided every 3-5 years in order to maintain pot size.
If you want your plant to keep getting larger, pot it up 2 inches and give the roots more space to grow. It’s also a good idea to stake the stems as they tend to droop as they get taller. These plants will grow as large as you let them. I’ve seen some older specimens that look like trees!
The average temperature and humidity in most home environments are perfect for these tropical plants. They love a bright, sunny window, especially during the cooler months but avoid direct summer sun. My Angel Wing Begonias prefer east-facing windows.
Read on to learn more about caring for Angel Wing Begonia Miss Mummy ……


USDA Zone 10-11


They don’t like to completely dry out so water when the top 1-2 inches of soil is dry. If you are unsure, stick your finger in the soil. Too much water can cause root rot and yellowing on the leaves.


These usually start out medium-sized but can grow very large if allowed.


They prefer bright, indirect light but can grow well in medium-light situations. They will need more light in order to bloom.


Use a rich potting mix that drains well. Compost will add much-needed nutrients.


They are native to subtropical regions and like 50% or higher humidity levels.


Angle Wing Begonia flowers are edible. The leaves, stems, and roots are toxic. Find pet-safe plants here.


Fertilize every three months during the growing season with Green Grub Insect Frass. You can either make a compost tea to water with every time or sprinkle a layer of fertilizer on top of the soil. If using synthetic, use an all-purpose houseplant fertilizer with a higher phosphorus content to encourage blooms.


Propagate by stem cuttings and division. Read on for propagation instructions.


How to Propagate Angel Wing Begonia Miss Mummy
Propagating Angel Wing Begonia is a piece of cake. It can be propagated by cuttings and division. Regular pruning encourages a more bushy plant and division allows the current pot size to be maintained. Pruning and propagating are best done in the spring during active growth.
Division
1. This is easily done while repotting your plant and allows the current pot size to be maintained. Instead of potting up, you divide the plant into 2-3 sections. Once you have the rootball out of the pot, use a sharp knife to cut individual offsets away from the main plant. Make sure to get enough roots to support the new offset.
2. Likewise you can also loosen the rootball with your fingers and gently separate the offset from the main plant.
3. Plant your new offset into a rooting medium, keep moist and wait for the plant to establish.
4. Once your offset is established and growing well. Repot into a pot that is 1 inch larger than the rootball and enjoy your new plant!
Stem Cuttings
1. Take cuttings of healthy stems that have 3-4 leaves. I prefer each stem to be 3-4 inches tall.
2. Plant the stem(s) into a rooting medium and keep the medium moist, not wet. You may also use a clear jar of water for water rooting.
3. Cover with a clear plastic or glass dome so that the leaves do not dry out. Seed starting kits and propagation boxes work well for this.
4. Place your cuttings/ prop box in a warm area with bright indirect light and keep medium moist, not wet.
5. Wait for new growth. Once you have a thriving plant, repot, and slowly acclimate to a less humid environment.


-2")
-2")
")

-10")